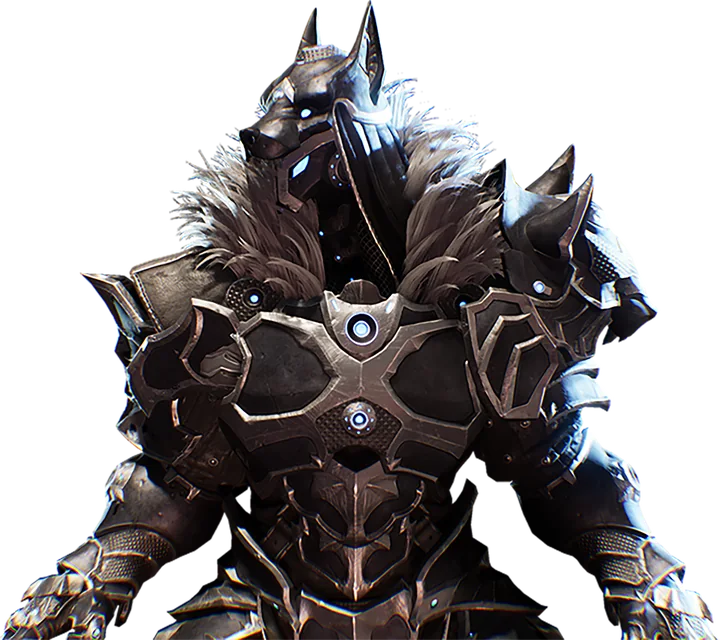
Originally a lesser worn Valorplate, the Armor of Cunning quickly symbolized ambition and power once it became the favored choice of Macros. To this day, Hinterclaw strikes fear in all its enemies.
Codex
Hinterclaw is a damage-focused Valorplate that emphasizes Critical Hit chance and damage, and offers new ways to use both.
With Dominance, some of the Critical Hit damage you deal with Heavy Attacks is stored in your Vengeance Meter. Whenever you hit an enemy with a Charged Heavy Attack while your Vengeance Meter is full, expend your Vengeance Meter to deal bonus damage to the enemy. This bonus damage is a Critical Hit.
Using Great Hunt Technique, enemies hit with a fully-charged Sundering Slam drop orbs that grant Critical Hit damage
Way of the Wolf applies a Doom Tag to an enemy whenever you hit them with a Timing Attack. The tagged enemy stores some of the Critical Hit damage you deal to them. When the tag expires or the enemy is defeated, stored damage is unleashed as a shockwave that deals damage to the tagged enemy and nearby enemies.
Display of Power allows your Banner to charge a shockwave whenever you deal Critical Hit damage within your Banner Aura. When the shockwave is ready, you can activate your Banner again to unleash it to deal Critical Hit damage.
The game's own text DataminedCodex.Valorplates.Hinterclaw
Shards
Each Valorplate has 4 Shardsrunes. A Shard's numbers follow your level, not the level it dropped at, and grow with its rank: it starts at rank 1 and can be upgraded up to 5 times Datamined. Every Shard drops as LegendarylootItem rarity of every rune row.
Shard rank
Display of PowerRune.Hinterclaw.4
Rank 1Your Banner charges a shockwave whenever you deal Critical Hit damage within your Banner Aura. When the shockwave is ready, activate your Banner again to unleash it. The shockwave deals 8000 Critical Hit damage.
Rank 6Your Banner charges a shockwave whenever you deal Critical Hit damage within your Banner Aura. When the shockwave is ready, activate your Banner again to unleash it. The shockwave deals 12000 Critical Hit damage.
Your Banner charges a shockwave whenever you deal Critical Hit damage within your Banner Aura. When the shockwave is ready, activate your Banner again to unleash it. The shockwave deals 8000 Critical Hit damage.
Your Banner charges a shockwave whenever you deal Critical Hit damage within your Banner Aura. When the shockwave is ready, activate your Banner again to unleash it. The shockwave deals 8800 Critical Hit damage.
Your Banner charges a shockwave whenever you deal Critical Hit damage within your Banner Aura. When the shockwave is ready, activate your Banner again to unleash it. The shockwave deals 9600 Critical Hit damage.
Your Banner charges a shockwave whenever you deal Critical Hit damage within your Banner Aura. When the shockwave is ready, activate your Banner again to unleash it. The shockwave deals 10400 Critical Hit damage.
Your Banner charges a shockwave whenever you deal Critical Hit damage within your Banner Aura. When the shockwave is ready, activate your Banner again to unleash it. The shockwave deals 11200 Critical Hit damage.
Your Banner charges a shockwave whenever you deal Critical Hit damage within your Banner Aura. When the shockwave is ready, activate your Banner again to unleash it. The shockwave deals 12000 Critical Hit damage.
DataminedAt your level (50) DataminedTrait.Rune.Hinterclaw.4.1Keywords: Critical HitKeyword.Banner.Aura
Great Hunt TechniqueRune.Hinterclaw.2
Rank 1Whenever you hit an enemy with a fully-charged Sundering Slam, they drop 2 orbs that grant +180% Critical Hit damage for 15 seconds (Max: 180% Critical Hit damage, Cooldown: 30 seconds)
Rank 6Whenever you hit an enemy with a fully-charged Sundering Slam, they drop 2 orbs that grant +270% Critical Hit damage for 15 seconds (Max: 270% Critical Hit damage, Cooldown: 30 seconds)
Whenever you hit an enemy with a fully-charged Sundering Slam, they drop 2 orbs that grant +180% Critical Hit damage for 15 seconds (Max: 180% Critical Hit damage, Cooldown: 30 seconds)
Whenever you hit an enemy with a fully-charged Sundering Slam, they drop 2 orbs that grant +198% Critical Hit damage for 15 seconds (Max: 198% Critical Hit damage, Cooldown: 30 seconds)
Whenever you hit an enemy with a fully-charged Sundering Slam, they drop 2 orbs that grant +216% Critical Hit damage for 15 seconds (Max: 216% Critical Hit damage, Cooldown: 30 seconds)
Whenever you hit an enemy with a fully-charged Sundering Slam, they drop 2 orbs that grant +234% Critical Hit damage for 15 seconds (Max: 234% Critical Hit damage, Cooldown: 30 seconds)
Whenever you hit an enemy with a fully-charged Sundering Slam, they drop 2 orbs that grant +252% Critical Hit damage for 15 seconds (Max: 252% Critical Hit damage, Cooldown: 30 seconds)
Whenever you hit an enemy with a fully-charged Sundering Slam, they drop 2 orbs that grant +270% Critical Hit damage for 15 seconds (Max: 270% Critical Hit damage, Cooldown: 30 seconds)
Rank 1Apply a Doom Tag for 10 seconds whenever you hit an enemy with a Timing Attack. The tagged enemy stores 40% of Critical Hit damage you deal to them. When the tag expires or the enemy is defeated, stored damage is unleashed as a shockwave that deals damage to the tagged enemy and nearby enemies.
Rank 6Apply a Doom Tag for 10 seconds whenever you hit an enemy with a Timing Attack. The tagged enemy stores 60% of Critical Hit damage you deal to them. When the tag expires or the enemy is defeated, stored damage is unleashed as a shockwave that deals damage to the tagged enemy and nearby enemies.
Apply a Doom Tag for 10 seconds whenever you hit an enemy with a Timing Attack. The tagged enemy stores 40% of Critical Hit damage you deal to them. When the tag expires or the enemy is defeated, stored damage is unleashed as a shockwave that deals damage to the tagged enemy and nearby enemies.
Apply a Doom Tag for 10 seconds whenever you hit an enemy with a Timing Attack. The tagged enemy stores 44% of Critical Hit damage you deal to them. When the tag expires or the enemy is defeated, stored damage is unleashed as a shockwave that deals damage to the tagged enemy and nearby enemies.
Apply a Doom Tag for 10 seconds whenever you hit an enemy with a Timing Attack. The tagged enemy stores 48% of Critical Hit damage you deal to them. When the tag expires or the enemy is defeated, stored damage is unleashed as a shockwave that deals damage to the tagged enemy and nearby enemies.
Apply a Doom Tag for 10 seconds whenever you hit an enemy with a Timing Attack. The tagged enemy stores 52% of Critical Hit damage you deal to them. When the tag expires or the enemy is defeated, stored damage is unleashed as a shockwave that deals damage to the tagged enemy and nearby enemies.
Apply a Doom Tag for 10 seconds whenever you hit an enemy with a Timing Attack. The tagged enemy stores 56% of Critical Hit damage you deal to them. When the tag expires or the enemy is defeated, stored damage is unleashed as a shockwave that deals damage to the tagged enemy and nearby enemies.
Apply a Doom Tag for 10 seconds whenever you hit an enemy with a Timing Attack. The tagged enemy stores 60% of Critical Hit damage you deal to them. When the tag expires or the enemy is defeated, stored damage is unleashed as a shockwave that deals damage to the tagged enemy and nearby enemies.
Rank 1Whenever you hit an enemy with a Charged Heavy Attack while your Vengeance Meter is full, expend your Vengeance Meter to deal bonus damage to the enemy. This bonus damage is a Critical Hit.
Rank 6Whenever you hit an enemy with a Charged Heavy Attack while your Vengeance Meter is full, expend your Vengeance Meter to deal bonus damage to the enemy. This bonus damage is a Critical Hit.
Whenever you hit an enemy with a Charged Heavy Attack while your Vengeance Meter is full, expend your Vengeance Meter to deal bonus damage to the enemy. This bonus damage is a Critical Hit.
Whenever you hit an enemy with a Charged Heavy Attack while your Vengeance Meter is full, expend your Vengeance Meter to deal bonus damage to the enemy. This bonus damage is a Critical Hit.
Whenever you hit an enemy with a Charged Heavy Attack while your Vengeance Meter is full, expend your Vengeance Meter to deal bonus damage to the enemy. This bonus damage is a Critical Hit.
Whenever you hit an enemy with a Charged Heavy Attack while your Vengeance Meter is full, expend your Vengeance Meter to deal bonus damage to the enemy. This bonus damage is a Critical Hit.
Whenever you hit an enemy with a Charged Heavy Attack while your Vengeance Meter is full, expend your Vengeance Meter to deal bonus damage to the enemy. This bonus damage is a Critical Hit.
Whenever you hit an enemy with a Charged Heavy Attack while your Vengeance Meter is full, expend your Vengeance Meter to deal bonus damage to the enemy. This bonus damage is a Critical Hit.
DataminedAt your level (50) DataminedTrait.Rune.Hinterclaw.1.2Keywords: Charged Heavy Attack
Rank multipliers
Rank
Multiplier on most Shard values
1
× 1
2
× 1.1
3
× 1.2
4
× 1.3
5
× 1.4
6
× 1.5
The game's Shard rank multipliers DatamineditemScalingMultipliers → type Rune.Upgrade. Values that don't grow (for example chances) stay × 1 at every rank.
What the Codex says about Shards
Valorplate Shards · Codex, Valorplates
Valorplate Shards are items that grant powerful abilities. They can be equipped on the Shards tab of the Valorplate screen, where each Valorplate has 4 unique Shards to choose from. You can save a different Shard configuration in each Loadout to better coordinate your Gear and Skills.
Shards can be unlocked by completing special objectives while using the Valorplate that the Shard belongs to. You can view each Shard in the Armory to see their unique traits, as well as the objectives required to unlock them. Once unlocked, each Shard can be upgraded up to 5 times in the Forge, increasing the strength of the Shard's traits. Higher level upgrades require you to first collect a minimum number of total Shards.
Collecting all 4 Shards for a Valorplate will cause the Valorplate to become Ascendant, providing the Valorplate with an additional passive ability. Fully upgrading all 4 Shards for a Valorplate will cause the Valorplate to become Exalted, providing the Valorplate with yet another passive ability.
The game's own text DataminedCodex.Valorplates.Shards
Augment sockets
7 sockets: 1 White · 2 Red · 2 Green · 2 Blue. Below is its Augment Constellation, laid out as on the Augments screen Datamined. The number in each socket is the Valorplate level that unlocks it.
Lines join adjacent sockets. Augments in two joined sockets are adjacent, which is what traits about an Adjacent Augment count Datamined.
Colour decides what fits. A White (neutral) socket takes any augment; a coloured socket takes only augments of its own colour Datamined. The Codex says the same (below).
Hover over or tap a socket to see which sockets it's joined to.
Level 10 White socket: adjacent to the level 20 Blue, the level 30 Green, the level 35 Green, the level 40 Red, the level 45 Red and the level 50 Blue sockets. Takes any augment.
Level 20 Blue socket: adjacent to the level 10 White, the level 30 Green and the level 50 Blue sockets. Takes Blue augments only.
Level 30 Green socket: adjacent to the level 10 White, the level 20 Blue and the level 35 Green sockets. Takes Green augments only.
Level 35 Green socket: adjacent to the level 10 White, the level 30 Green and the level 40 Red sockets. Takes Green augments only.
Level 40 Red socket: adjacent to the level 10 White, the level 35 Green and the level 45 Red sockets. Takes Red augments only.
Level 45 Red socket: adjacent to the level 10 White, the level 40 Red and the level 50 Blue sockets. Takes Red augments only.
Level 50 Blue socket: adjacent to the level 10 White, the level 20 Blue and the level 45 Red sockets. Takes Blue augments only.
White (any augment)RedGreenBlue
Unlocks at level
Colour
Adjacent sockets (unlock level)
Fits
10node 1
White
● 20 Blue · ● 30 Green · ● 35 Green · ● 40 Red · ● 45 Red · ● 50 Blue
Takes any augment.
20node 2
Blue
● 10 White · ● 30 Green · ● 50 Blue
Takes Blue augments only.
30node 3
Green
● 10 White · ● 20 Blue · ● 35 Green
Takes Green augments only.
35node 4
Green
● 10 White · ● 30 Green · ● 40 Red
Takes Green augments only.
40node 5
Red
● 10 White · ● 35 Green · ● 45 Red
Takes Red augments only.
45node 6
Red
● 10 White · ● 40 Red · ● 50 Blue
Takes Red augments only.
50node 7
Blue
● 10 White · ● 20 Blue · ● 45 Red
Takes Blue augments only.
What the Codex says about Augments
Augments · Codex, Character
Enhance your Valorplates by inserting Augments into their unique Augment Constellations. Augments have 3 possible Affinities: Red, Green, and Blue. They can only slot into neutral or matching nodes. Each Augment has a Power Drain amount. Your total Power Drain cannot exceed your Valorplate's Power Capacity.
Augments can be equipped and saved as part of your Valorplate's loadout. Each Valorplate has a different Augment layout, so be sure to experiment to find a configuration that works best for your build.
The game's own text DataminedCodex.Tutorials.Augments
For the curious: this Valorplate's Archon Fury numbers in the game files
The game never shows these names; they're spelled out here from the files. What each one does in play is UNKNOWN until tested.
Setting (name spelled out)
Value
Archon charge gain multiplierarchonChargeGainMultiplier
Hinterclaw, Betrayed AlphaHinterclaw, Lord of the WildernessHinterclaw, Ice WolfHinterclaw, Lone WolfHinterclaw, Pride of AnadoleHinterclaw, The AdversaryHinterclaw, Pristine PredatorHinterclaw, HellhoundHinterclaw, Archon of PowerHinterclaw, Avatar of Power
History
No official patch notes have been added yet. When they are, each entry will quote the notes word for word, with the date and a link, marked Documented. Patch notes record changes over time; the values on this page come from the game version this wiki is built from.
Constellation (socket positions and lines): Aperion/Content/uiresources/static/js/main.27a82b73.chunk.js (pakchunk0-WindowsNoEditor.pak), the menus' constellations data, copied by tools/extract_pak_files.py and read by tools/extract_constellations.pyDatamined; socket colours and unlock levels: augmentGraphs
Sockets: augmentGraphs · Shards: runes + trait; rarity from lootItem; ranks from itemScalingMultipliers (Rune.Upgrade) · Skins: cosmetics
Portrait: the menus' side profile T_VP_SideShot_Hinterclaw (/Game/Aperion/UI/Textures/Coherent/img/runes/side-profile), matched by ui_src/main/containers/RuneDetails/selector.ts VALORPLATE_ID_TO_SIDE_PROFILE_PATH